Hopefully by now I've convinced you that programming involves a process of
solving problems in stages. Since most computer programs that you will
want to write are too complex to simply type-in, you need to take advantage
of the concept of
procedural abstraction. Break the problem
that you are writing into pieces. Think about what you need to do; of
this, think about what you already know how to do.
Start writing a program in pieces. Each piece is written as a
procedure which you define. Your procedures are simply lists of
instructions. In techie terms, you are using
abstraction to make the source
code easier to understand and thus easier to write correctly and easier to
enhance.
As you think about the steps or as you are typing in instructions, you will
recognize similarities or patterns in the code. When you discover a
pattern with the same instructions being used over and over again, you can
reduce the amount of source code you have to type by using
iteration
- you learned about this (the
repeat
command) a couple of lessons ago. Using iteration makes your programs smaller,
and so, easier to understand.
But, iteration only lets you eliminate duplicated instructions, identical
source code, that your want to do multiple times.
In this lesson, you will learn how to define procedures that have
inputs,
also known as
parameters.
These
inputs (their names) are used in the body of the procedure in place
of specific (
actual) values. When you
invoke the procedure, you provide a
specific (
actual) value to use in place of the input, everywhere its name
is in the body of the procedure.
Procedures with inputs allow you to reduce multiple,
similar, patterns
of instruction sequences to a single instruction. Confused? It will
become clearer as this lesson progresses...
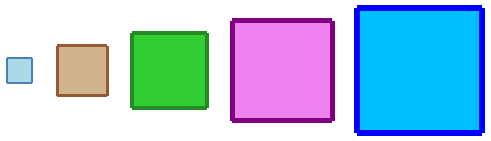
Similar, But Different, Boxes
Look at the series of objects in Figure 7.1. What are the similarities
of the objects? What are the differences? Take a moment to write your
thoughts.
 Figure 7.1
Now, write a program,
boxes, which draws the series of growing boxes.
Your program should consist of a procedure for each box. Then, write a
main procedure which contains invocations of these new procedures.
Finally, invoke
main to display the row of boxes.
If you are confused, refresh your memory regarding defining procedures, review
Definition of a Procedure. Also rereading
the last lesson's Summary may help. Give
this exercise a good effort before reading on.
Similar Procedures
Here are my definitions of the procedures which draw the first couple of boxes and part
of the definition of the
main procedure.
   ;draw a box 25 turtle steps on a side
   to box25
     repeat 4 [forward 25 right 90]
     end

   ;draw a box 50 turtle steps on a side
   to box50
     repeat 4 [forward 50 right 90]
     end

   to main
     home clean setheading 0 setpencolor 0 setpensize 1
     penup left 90 forward 250 right 90 pendown
     box25
     penup right 90 forward 70 left 90 pendown
     box50
     ;...
     end
|
Since the procedures draw different sized boxes, I've given each of them an appropriate
name. But check them out carefully, the only difference in the instructions that
make-up the
bodies of these procedures is
the number of steps that the turtle is told to move
forward.
Think about this scenario. Logo doesn't have an infinite set of
forward commands, e.g., fd25, fd50, fd75, etc...
There are not commands for all possible
right instructions,
e.g., rt30, rt45, rt90, etc... There are commands
forward,
fd,
right, and
rt which
expect an
input that specifies the number of steps to move or the number of degrees
to rotate.
We obviously need the capability to define procedures that can be used in a similar
manner. We need the ability to define a procedure named
box that expects
to get a number when it's
invoked.
The number will determine the size of the box drawn.
What we need is called an
input.
Defining a Procedure With an Input
Here is what we want...
   ;draw a box of a specified size.
   to box :size
     repeat 4 [forward :size right 90]
     end
|
This procedure definition has an
input. Similar to the way you
name the procedure itself, you give the input a name, an
identifier. In this example,
I've chosen the name
size. The colon ("
:") preceding the name
(pronounced "dots") tells the interpreter that this word is an input and that
it should use what's
in it.
What do I mean,
in it? Well, an input is one kind of a thing
that's called a
variable.
Variables are containers. Inputs get a value put into them when the procedure
they are part of is invoked.
Up until now, all of the programs you've written have been composed of commands with
literals as arguments. Literals are
constants like the number "4" in the
repeat instruction
in the example above. Every time
box is invoked, the
<list-of-Instructions> input to the
repeat command is performed
4 times.
But now, the input to the
forward command is a variable
- the input named
size. The number of steps that the turtle moves forward is
equal to the input provided in an invocation of box. The turtle moves a
variable
number of steps every time the Logo interpreter performs the
box procedure.
Here's the TG applet. Type in the example definition of
box from above
and then invoke it a couple of time with different values as arguments, e.g.,
alt="Your browser understands the <APPLET>
tag but isn't running the applet, for some reason."
Your browser is completely ignoring the <APPLET> tag!
TG Programming Environment Applet
If this applet is broken and you are using Chrome, click here.
Then, see what the following
repeat instructions do.
repeat 4 [ box 25 box 50 box 75 left 90 ]
|
repeat 24 [ box 60 box 90 right 15 ]
|
Multiple Inputs
Procedures are not limited to zero or one inputs. Procedures are allowed to have more
than one input. The
repeat command we have been using
has two, a
count and an
instruction-list. Another Logo command that takes
two inputs and that we will use later in this lesson is
setxy.
Its two inputs are an
X coordinate followed by a
Y coordinate. The turtle
moves in a straight line to the
X,
Y point, without changing its heading. If
the pen is down, it draws a line to the point.
Here is a list of instructions that draws a triangle in the center of the graphics canvas.
   home clean showturtle throttle 1200
   penup setxy 0 100
   pendown setxy 100 -100  setxy -100 -100 setxy 0 100
|
The boxes we have been drawing are squares, a special case of a rectangle. Here is the
definition of a new procedure which draws a rectangle.
   ;draw a rectangle of a specified size, at the turtle's
   ;current location, with current pen size and color
   to drawRectangle :width :height
     repeat 2 [forward :height right 90 forward :width right 90]
     end
|
Type it in. Try it out. Play with a variety of different inputs.
Logo Animation - Watching Inputs in Action
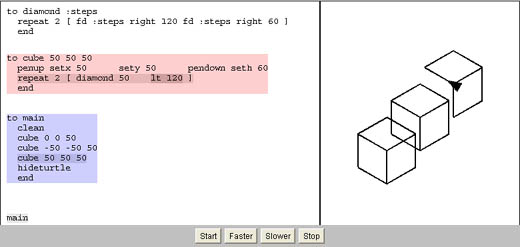 Figure 7.2
Click here to see an applet that demonstrates the execution of a small program which
draws three cubes. If you are having any trouble visualizing how inputs get
their values when a procedure, which has, them gets invoked, go watch it... Watch
how the program is executed, step by step.
Figure 7.2
Click here to see an applet that demonstrates the execution of a small program which
draws three cubes. If you are having any trouble visualizing how inputs get
their values when a procedure, which has, them gets invoked, go watch it... Watch
how the program is executed, step by step.
Practice: Cartesian Axes
One thing we have been doing since we started to write our programs is figuring out where
we should draw things on the graphics canvas. What can help with this is to draw a
pair of X and Y axes. They give you guidelines for the center of the canvas, the
dividing lines between positive and negative X and Y values. Tick marks along the
the axes help approximate the values of point coordinates, where we draw things.
If you need to learn a bit, or refresh your memory, about the Cartesian coordinate system,
here is a link to the
Math is Fun website which has a nice page describing it.
Now, let's generalize the program you have seen twice in the exercises,
first in the second lesson and also
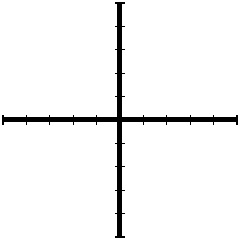
in lesson 5 (Iteration). Figure 7.3a shows
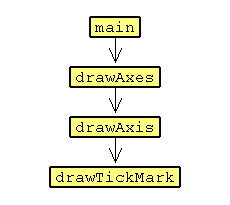
one example of a set axes our program will draw. Figure 7.3b shows the call
graph for the program I have in mind.
 |
 |
|
(a) Cartesian Axes
|
(b) DrawAxes Call Graph
|
Figure 7.3
Let's start with the code for
drawTickMark.
   ; draw a tick mark at the turtle's current location
   ; the tick mark is drawn perpendicular to its heading
   ; input :len is length the tick mark extends outward
   to drawTickMark :len
     setpensize 1  setpencolor 15
     right 90 forward :len back :len
     left 180 forward :len back :len
     right 90
     end
|
And the code for
drawAxis which invokes
drawTickMark.
   ; draw an axis at the turtle's current location
   ; the axis runs along the turtle's current heading
   ; input :numTicks is the number of tick marks drawn out from the origin
   ; input :gapLen is the distance between tick marks
   ; input :ticLen is the distance a tick mark extends outward from axis
   to drawAxis :numTicks :gapLen :ticLen
     pendown
     repeat :numTicks [setpencolor 0 setpensize 3 forward :gapLen drawTickmark :ticLen]
     penup repeat :numTicks [back :gapLen]
     right 180
     pendown
     repeat :numTicks [setpencolor 0 setpensize 3 forward :gapLen drawTickmark :ticLen]
     penup repeat :numTicks [back :gapLen]
     left 180
     end
|
Study these procedures for a few minutes. If you have TG running on your system,
copy/paste them into the Editor. Or, use
the TG applet;
the above code is available as DrawAxis.jlogo
(use
the loadcode directive to get the code into the Editor).
Experiment with
drawAxis.
Then write procedures
drawAxes and
main so that your program draws
axes matching those in Figure 7.3(a).
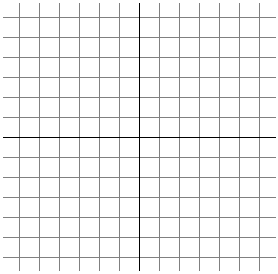
With my solution, I was able to change three numbers in the source code and draw
the grid shown in Figure 7.4. Can you get your program to draw a grid
with minimal changes?
Figure 7.4
As you should now be able to see, inputs are a very powerful tool in programming.
Practice: drawRect and fillRect
drawRect
The TG application/applet you are using is written in Java - which is why I've given
the dialect of Logo it provides the name
jLogo. One goal is to prepare
students for the AP Computer Science curriculum, which currently is based on the Java
programming language. I'm going to take advantage of the current lesson's
objective (to introduce procedure inputs) and introduce you to a couple of Java's
primitive graphics procedures. We will then define them as Logo procedures
for use in our programs. Here is a description of the first one, Java's
Graphics.drawRect.
    drawRect( int x, int y, int width, int height )

    drawRect draws the outline of the specified rectangle. The
    left and right edges of the rectangle are at x and x + width.
    The top and bottom edges are at y and y + height. The
    rectangle is drawn using the current color.

    Parameters:
    x - the x coordinate of the rectangle to be drawn.
    y - the y coordinate to the rectangle to be drawn.
    width - the width of the rectangle to be drawn.
    height - the height of the rectangle to be drawn.
So what are the differences between what we have been doing with the turtle to
draw boxes and Java's
drawRect procedure?
-
Java's Graphics support has no concept of a current location; in Logo it's the
turtle's location. We have been writing procedures that draw things starting
whereever the turtle is. With no current location, Java's drawRect needs
to have two inputs, X and Y, which identify the upper-left corner of
the rectangle to be drawn. Why the upper-left corner...
-
There is a major difference in the layout of Java's coordinate system when compared
with TurtleSpace. All graphics in
Java is relative to the top-left corner of its canvas. This point is addressed
0,0. X coordinates increase to the right; Y coordinates
increase downwards. Its coordinates are
Whole Numbers.
TurtleSpace is a traditional
Cartesian coordinate
system, with approximated
Real Numbers for coordinates.
-
All of the boxes (and polygons) we have drawn so far have been oriented in the
direction the turtle is currently headed. We have had the turtle doing the drawing
by moving forward and turning at corners. This allowed us to draw some very elaborate
graphics with simple instructions
(see Nested Iteration). Since Java's
Graphics support has no turtle, there is no current heading. Instead, the edges of
the rectangle are parallel with the X and Y axes.
-
The rectangular outline produced by Java's drawRect is one pixel wide. Java's
low-level Graphics does not support the concept of a current line thickness.
Taking all of this into account, here is a Logo version of Java's
drawRect.
   ;draw a rectangle given its dimensions and location
   ;its sides are oriented north-south and east-west
   ;the turtle's current pen width and color are used
   to drawRect :leftX :bottomY :width :height
     penup  setxy :leftX :bottomY  pendown  setheading 0
     repeat 2 [forward :height right 90 forward :width right 90]
     end
|
Read over this code closely. You'll find the new command introduced above.
setxy moves the turtle to the point in TurtleSpace specified by its two inputs.
There are also two other related commands I'll mention now which you should be aware of.
setx and
sety move the turtle to a provided coordinate, but only in a
horizontal or vertical direction (respectively).
Practice: Rewrite boxes
Your turn to write some code; rewrite the
boxes program this lesson
started off with, naming it
DrawBoxes. Include
drawRect in the program
and use it (invoke it) to draw all of the boxes.
fillRect
A second Java primitive graphics procedure we will look at and write is
fillRect.
Here is a description of it.
    fillRect( int x, int y, int width, int height )

    fillRect fills the specified rectangle. The left and right
    edges of the rectangle are at x and x + width - 1. The top and
    bottom edges are at y and y + height - 1. The resulting rectangle
    covers an area width pixels wide by height pixels tall. The
    rectangle is filled using the graphics context's current color.

    Parameters:
    x - the x coordinate of the rectangle to be filled.
    y - the y coordinate to the rectangle to be filled.
    width - the width of the rectangle to be filled.
    height - the height of the rectangle to be filled.
As with our Logo
drawRect, we will stick with the
X and
Y coordinates
being the lower-left corner of the filled rectangle.
   ;draw a solid rectangle given its dimensions and location
   ;the rectangle is filled with the current pen color
   ;the turtle is left at the lower-left corner heading north
   to fillRect :leftX :bottomY :width :height
     penup  setxy :leftX :bottomY setheading 0 setpensize 1
     repeat :width [pendown forward :height penup back :height right 90 forward 1 left 90]
     right 90 back :width left 90
     end
|
Practice: Modify DrawBoxes
Your turn to write some code; modify your
DrawBoxes program to use
fillRect
in place of or in addition to
drawRect.
Figure 7.5 shows what I came up with; just an example...
Figure 7.5
Timeout... Does this make sense?
If defining and invoking procedures which have inputs is even the least bit confusing,
before moving on,
check out the
way procedure definition with an input is explained in the book: "Thinking About [TLC]
Logo" by clicking on this link.
Projects: Pick One
It is time for you to draw something with a program that uses programming techniques
we have learned so far. In a previous lesson (
Iteration), you learned two ways to draw a circle and how to draw a simple arc.
You've learned the importance of hierarchy for structuring your programs. And now
you know how to write procedures that have inputs - they can do the same sort of thing,
but their final result is dependent upon the inputs.
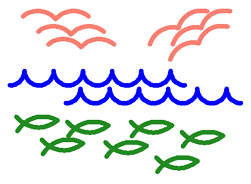
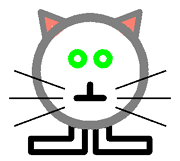
Pick something simple to draw and write a program to draw it.
Here are a few things I've come up with. A seascape made entirely using arcs, a
custom wheel, and a kitty cat...
Figure 7.6
Summary
In this lesson, you've learned how to extend the utility of procedures. You now
know how to write procedures that can act differently; exactly what gets done depends
upon the
inputs (
parameters) that
are provided on invocations. This is good for two reasons:
- You can reduce the size of your programs. The shorter your programs
are, the easier they are to read and understand, the less chance they have
mistakes in them, and the less you have to type.
- Your abstractions can be more powerful. Without inputs, a
procedure does the same thing every time it is invoked. This is pretty
limiting. But, with inputs, your procedures are much more flexible.

No comments:
Post a Comment